3D Printing the Higgs Guitar Prop from Death Stranding 2 — Complete Build Process
Inspiration & Reference

Like the five million others who bought the original Death Stranding, I was captivated by Hideo Kojima’s first game under Kojima Productions. I spent countless hours trekking across a fractured United States, fully immersed in its haunting beauty and unique gameplay. When the final two-hour cutscene rolled, I assumed that was it—a one-off masterpiece. But then came the unexpected: Kojima Productions announced Death Stranding 2, accompanied by a stunning—if characteristically cryptic—trailer.
At the 3:38 mark, we see the reveal of Higgs—sporting a new look and, most notably, wielding a guitar.

We wouldn’t see the full design of the guitar until a year later, in the State of Play announcement trailer. That trailer sealed the deal for me—I had to build this guitar.
I pulled every screenshot I could from the trailer and began my preliminary designs. It quickly became clear that I wouldn’t be able to create a fully accurate replica before the game’s launch—but that didn’t matter to me. I worked tirelessly with the limited reference material I had. Fortunately, James—co-founder of Make432—is a guitarist, so I used his collection of real guitars for scale reference. With that, I began modeling my version of what I started calling the Higgs Guitar.


Using the reference material I had, I filled in the gaps by drawing inspiration from real-world instruments—particularly synth guitars from the 1980s and 1990s, like the Casio DG-10. I also took cues from Fortune’s railgun design in Metal Gear Solid 2, which had a very similar design language.

I had everything I needed—it just had to come together. That process took about six months of design work in Fusion 360. But then I finally had my finished model.
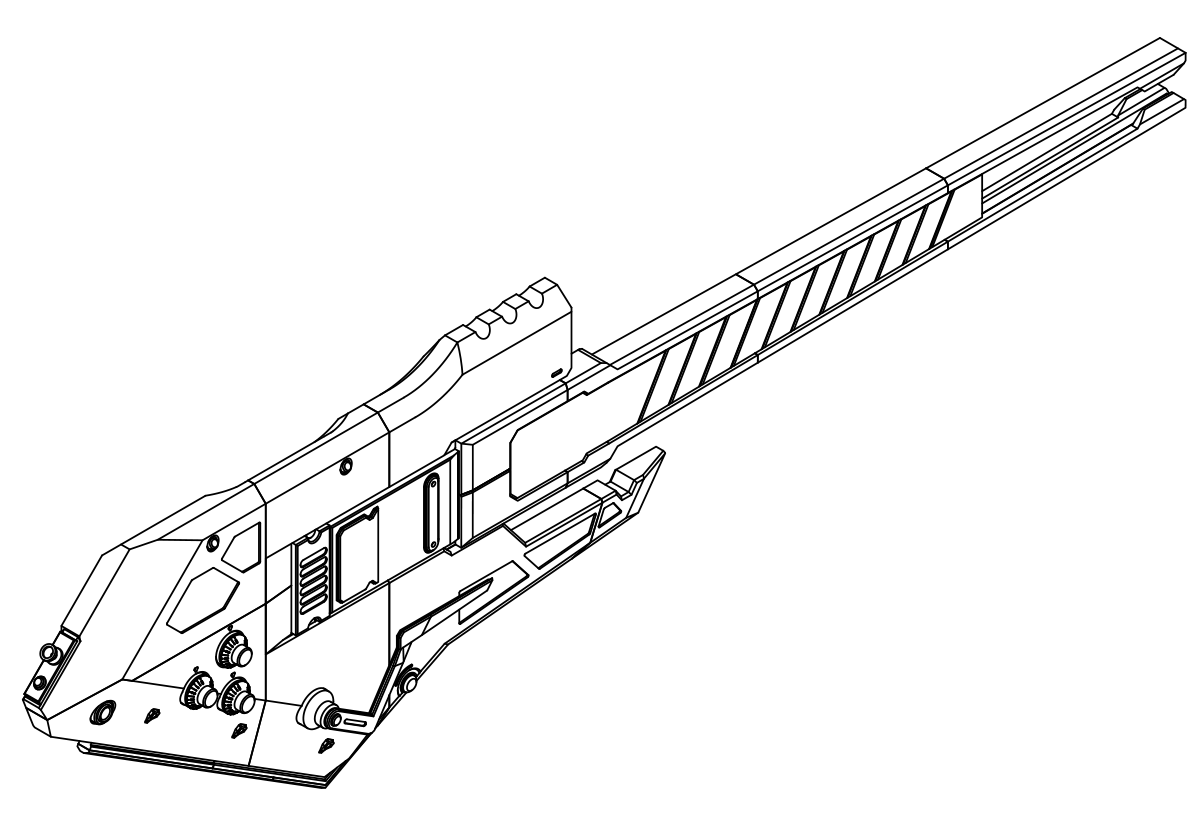
The 3d Model
I had a few key requirements while designing the Higgs Guitar:
Use actual guitar hardware – I didn’t see the point in modeling parts I could easily pick up at my local music store. Real components would enhance both realism and functionality.
Incorporate machine screws and mechanical connections wherever possible – This added to the overall realism and made certain parts functional rather than purely aesthetic.
Aim for 95% accuracy – Since I only had the game trailer as reference, I knew this wouldn’t be a perfect replica. I fully expect to create a V2 once Death Stranding 2 is released. But for now, my goal was to get as close as possible—while adding a bit of my own design flair.
Ensure it could be printed on a mid-size 3D printer – This was a challenge. While larger printers are more accessible now, most makers are still working with mid-size machines and moderate build areas. I kept that in mind when designing and slicing the model.
With these requirements in place—and after far too much testing—I’m proud to offer the Higgs Guitar, now available in our store.

As mentioned, the guitar is split into multiple smaller parts and uses actual hardware (links will be provided throughout the build process). However, I’ve also modeled those hardware components for anyone who prefers to keep the entire project 100% 3D printed.
In addition to the core build, I’ve integrated lighting into the blade and “barrel” areas, as well as some basic sound functionality.
That’s enough talk—let’s get into the build!
Step 1 - Printing
Step 1 was, of course, printing everything.
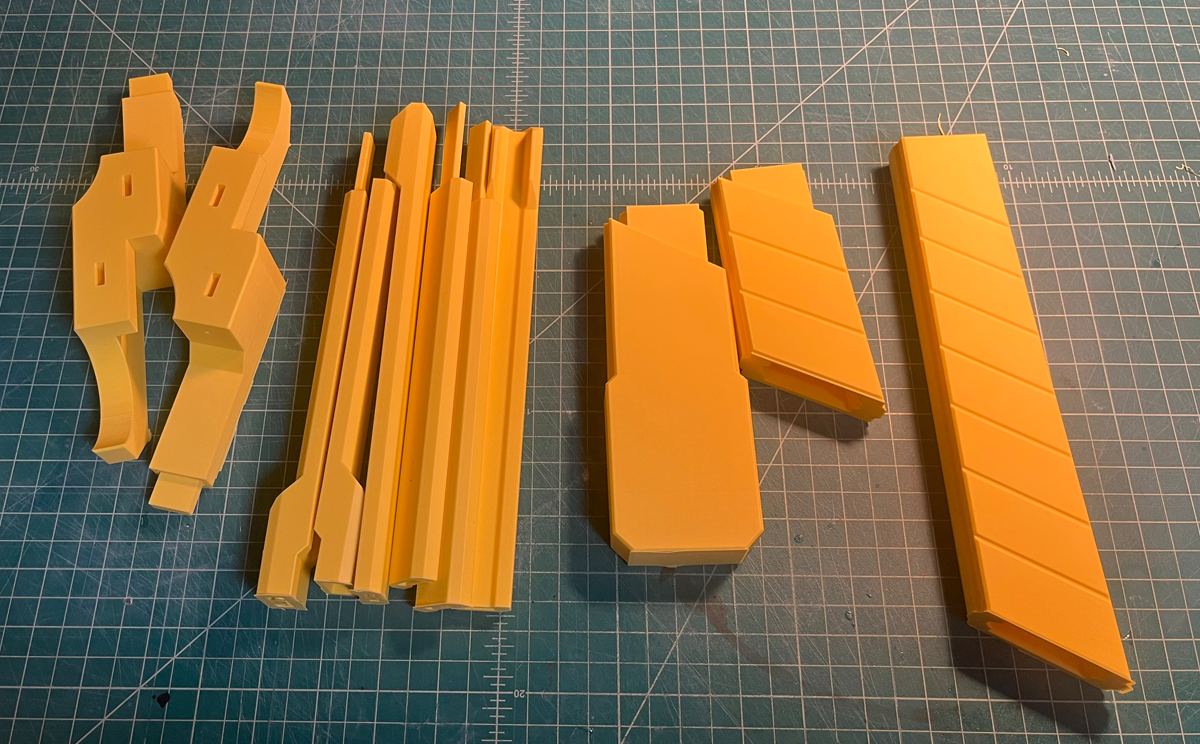
There are a lot of parts—everything is broken down to fit on most mid-size printers. I used a Bambu P1S for the entire print process (with a few resin parts added later), and everything came out great.
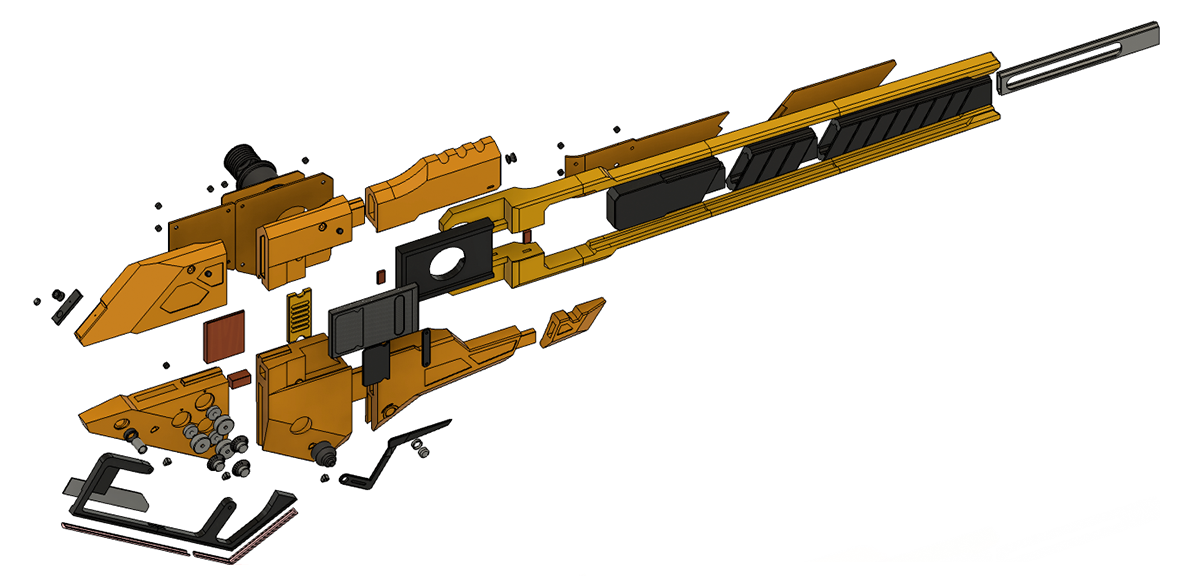
Due to the complexity of the project, I broke everything down into sub-assemblies. Much like a real guitar, the neck and body are separate components that are assembled together. This approach worked out perfectly in the end—and definitely helped keep me sane!
Assembly 1: The Neck

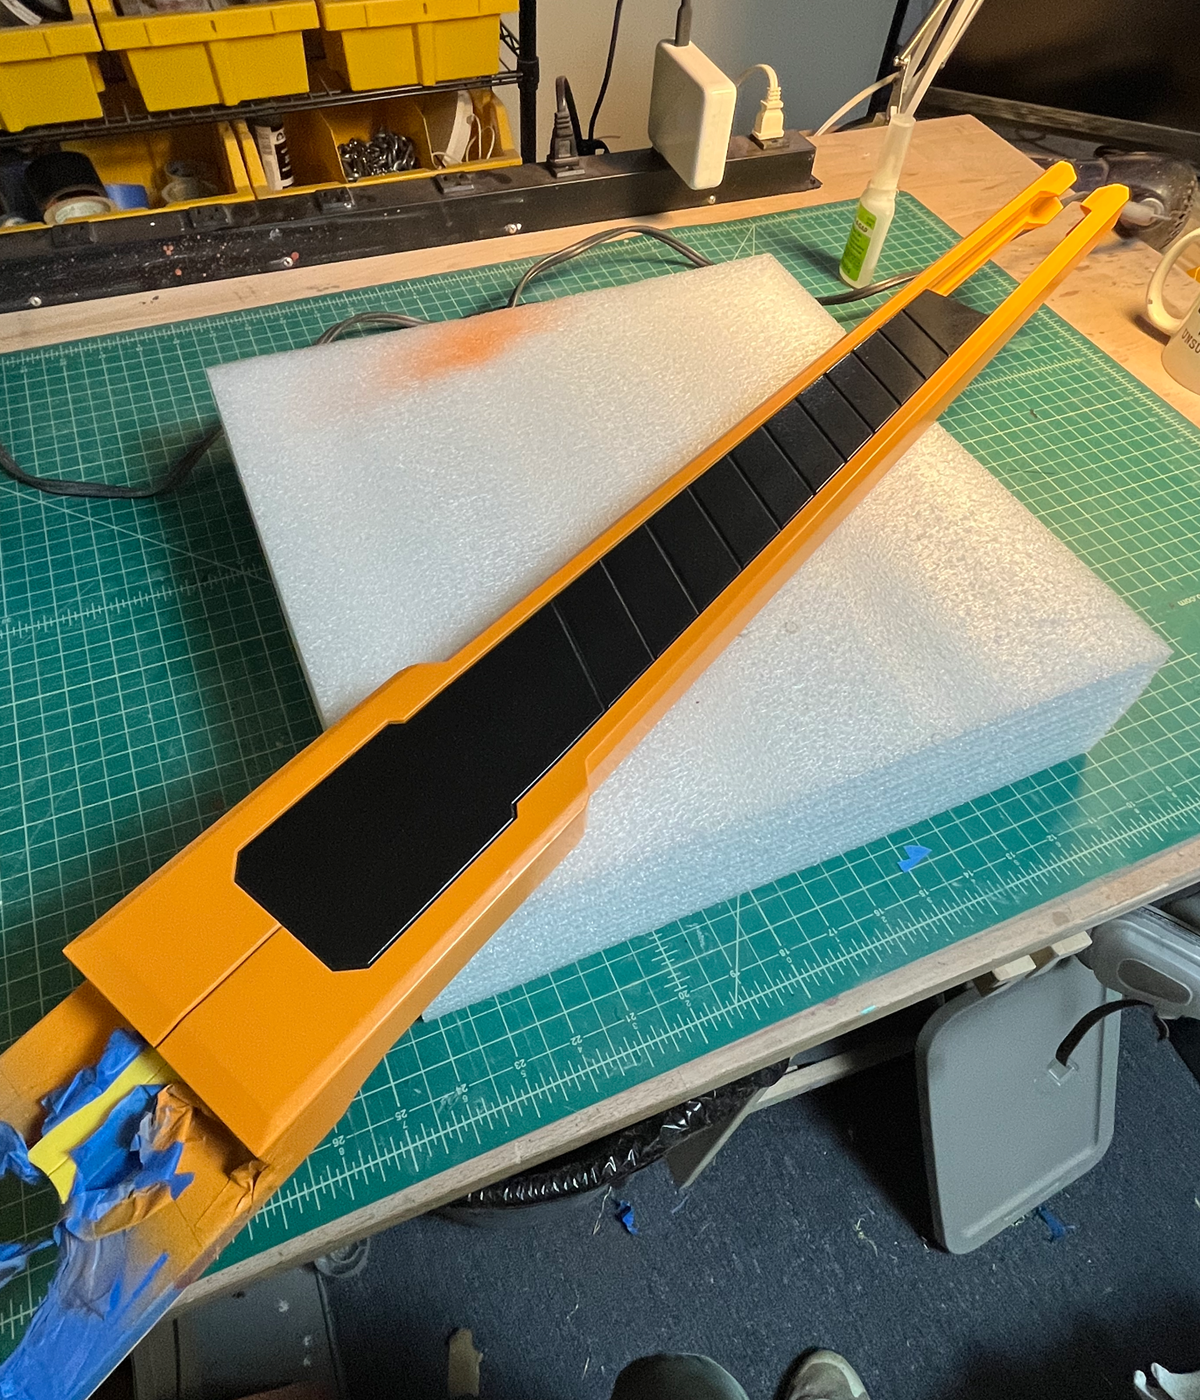
I started with the neck—mainly because it was the part of the design that initially drew me in. I decided to separate the “fretboard” from the “rails,” since they would be different colors in the final build. Keeping them as separate pieces made it much easier to paint them individually before assembling everything later.
The parts were printed in Polymaker Poly Terra PLA | Buy on Amazon Buy on PolyTerra Site
Each individual part was designed with built-in registration features to aid alignment and improve overall strength.

I assembled the fretboard and rails, holding off on the final glue-up until after painting.

I painted the fretboard using Rust-Oleum’s Hammered Metal spray paint. I'm not sure if it was intentional, but it has a bit of glitter in it—which actually ended up looking really cool. It also adds a subtle texture that helps avoid the overly plasticky look some 3D prints can have. The rails were painted with Montana Gold’s Orangina, which provided a striking contrast.
Of course, all painting was done after several rounds of sanding and priming with filler primer to smooth out the layer lines. This step has become much easier since switching to the Bambu P1S—layer lines are nearly invisible straight off the printer, making prep work much faster.


After painting, the fretboard could be sandwiched between the painted rails using two alignment pegs to ensure precise positioning.

With that I could set the neck aside and move to the main body.
Assembly 2: The Main Body
The main body—although much larger than the neck—is actually a much simpler assembly. Most of the parts have built-in registration, with a few keys that need to be printed and inserted separately. Overall, the assembly is pretty intuitive. I designed it so the top and bottom halves could be built separately, then glued together at the end.
The final step was adding the neck mount — this slides into place and will help secure several pieces together later on.


After assembling the main body components, I moved on to the standard finishing process: body filler, sanding, primer, spot filler, more primer, and additional sanding—repeating as needed until I achieved a smooth surface I was satisfied with.


After priming and sanding, I decided to add a texture coat. While not strictly necessary, it really helped reduce the "toy-like" appearance and gave the piece a more authentic, finished feel. I used Rust-Oleum Textured Spray Paint and applied a light, even coat. The color of the texture layer didn’t matter, as it was followed by the final coat of orange paint for the finished look.

For the final color, I used Montana Gold’s Orange. I love working with this paint—it's incredibly vibrant, offers excellent coverage, and dries quickly, making it a great choice for builds like this.

The “pickups” and “strum plate” were painted the same color as the frets for a cohesive look, then carefully glued into place.

With those pieces in place, I moved on to attaching the knobs. I opted to use real guitar knobs to give the build a more polished and realistic look—and I think it really paid off. That said, the files do include printable knob models if you prefer not to purchase additional hardware.

The knob mechanism is designed to allow the knobs to spin freely, adding a nice touch of interactivity. Just be careful during assembly—when gluing, take care not to accidentally fix the spinning components in place.

Additionally, I attached the guitar strap mounts to the front and back of the body. While there are printable versions included, if you plan to use a real strap, I highly recommend purchasing actual hardware mounts for better durability and fit.

Assembly 3: Full Body
With the neck and main body completed, I was able to attach the neck to the body. The design includes multiple registration keys to help align the parts easily and ensure a strong, accurate fit. The neck should slide into place smoothly and can be secured with glue. I recommend using a strong two-part epoxy for maximum hold and long-term durability.
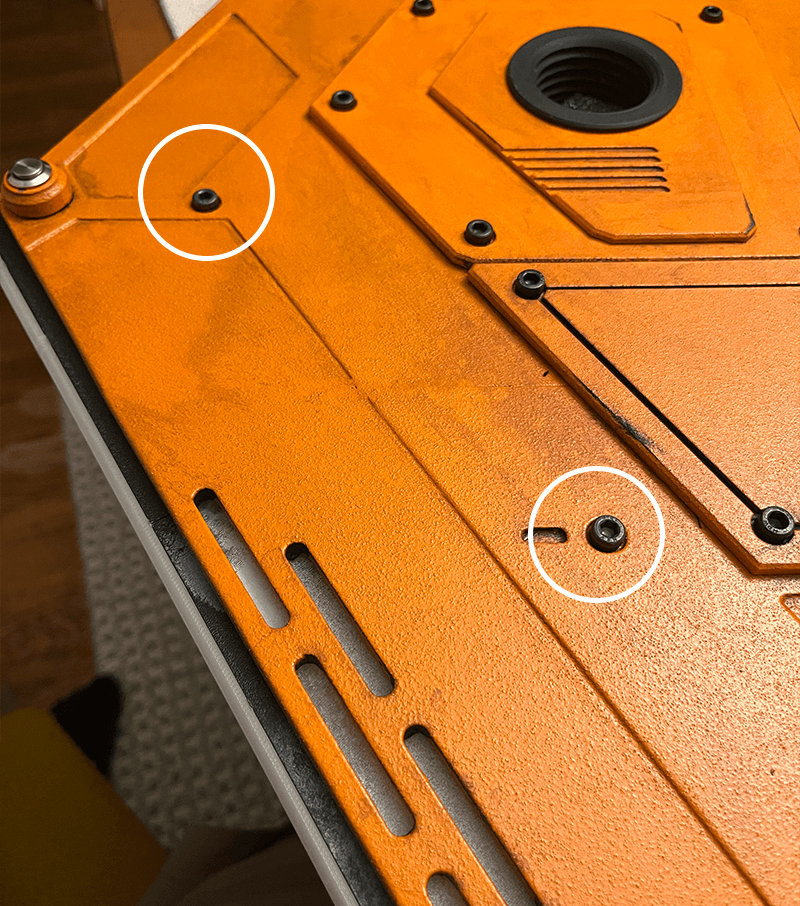
With the neck firmly in place, the back panels can be attached using M5 machine screws. This not only adds some nice visual detail to the rear of the build but also provides additional structural support for the neck connection.

Additionally, the fret guards can be attached to the back of the neck to complete the detailing and protect the frets.

The lower half of the fret guard is designed to be secured with M5 screws, making it removable for easy access to the electronics and lights.

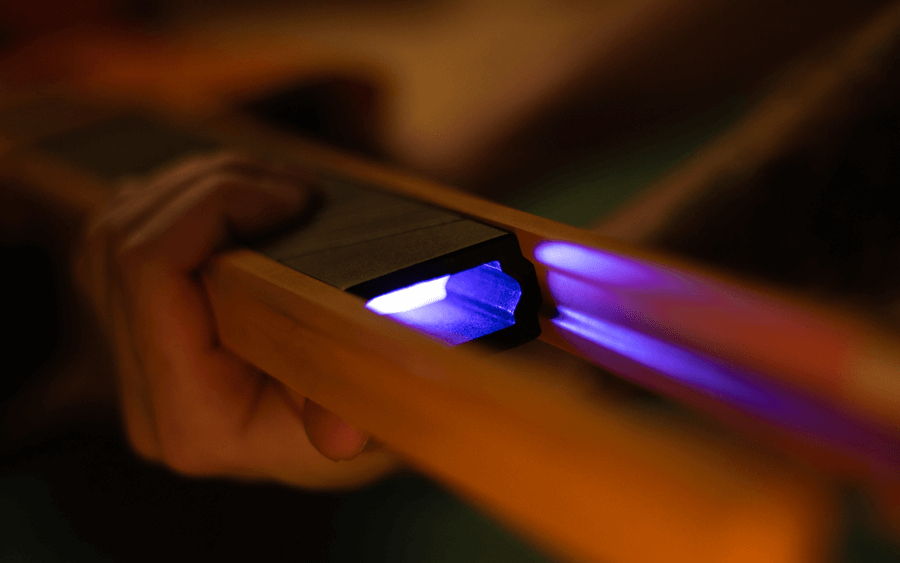
For the lighting setup, I used a simple circuit: just five LEDs wired to a small 3V coin cell battery. Everything runs through a momentary switch, which lets me control the effect with a quick press. It’s a super basic setup, but it adds a nice burst of light. In future iterations, I’d love to dial this effect up—maybe with brighter LEDs or even a pulsing animation to make it feel more dramatic and alive. But for now this will work great!.
The lighting rig slid neatly into the neck, with the wires feeding through a cavity I designed into the base. Once everything was in place, I sealed it up using a protective plate, secured with M5 screws. This setup keeps things clean and modular—if I ever need to swap the battery or troubleshoot the wiring, I can just unscrew the plate and get right in. It’s a small detail, but it really helps with long-term maintenance and makes the whole build feel more polished.


This next step is totally optional, but I really wanted the guitar to actually produce some sound. To make that happen, I modeled a cavity in the back to house a small Bluetooth speaker— specifically this one. The mounting bracket was printed in black PLA with integrated threads, so the speaker can be screwed in securely without additional hardware. I skipped painting this section entirely, since I knew I’d be opening and closing it frequently to recharge or power on the speaker. Leaving it unpainted helps prevent the threads from getting clogged or worn down over time.
The outer sleeve is permanently glued in place, while the inner components are held in with just the printed threads. This design keeps everything secure while still allowing access when needed. The outer sleeve also does double duty—it reinforces the connection between the neck and the main body, adding a bit of extra structural support to keep things solid during handling or display.
Also the speaker just looks cool on the back!


It actually sounds surprisingly good as well.
The final step was adding the small detail pieces across the body. These were printed separately in resin and painted before assembly. I prefer to model and print these kinds of accents as individual parts—it makes the painting process way easier and also helps during sanding and finishing since I don’t have to mask anything off. It does mean printing more pieces overall, but the added control and cleaner results are absolutely worth the extra effort.


Weathering
Once the guitar was fully assembled, I gave it a weathering pass to add some character. I’ve got mixed feelings about how it turned out—on one hand, the weathering gives it a gritty, well-used vibe, but honestly, the clean finish looked so sharp that it was almost a shame to cover it up. I actually ended up dialing the weathering back a bit with a light pass of orange spray paint to bring some of that crispness back.
My weathering process is pretty straightforward: I use cheap acrylics (mostly browns and blacks), thin them out with water, and brush the whole surface down until it looks pretty grimy. Then I wipe off as much as I can, letting the paint settle into the crevices and low spots. It’s a quick and dirty method—literally—but it does a solid job of building up realistic-looking grime and wear.


And here it is—the final result! Everything has been assembled… well, everything except the blade. I spent a lot of time going back and forth on the blade design, tweaking it until it felt right. It was definitely one of the trickier parts to finalize, but in the end, it really pulls the whole piece together. It’s the finishing touch that makes the build feel complete.
Assembly: Blade Cartridge
The blade is arguably the coolest part of this entire build. I designed a modular “cartridge system” that lets it slot directly into the main body. Just like with the rest of the electronics, my goal here was easy maintenance—making it simple to access for repairs, upgrades, or battery swaps down the line. The cartridge approach keeps everything self-contained and clean, while still being totally functional.
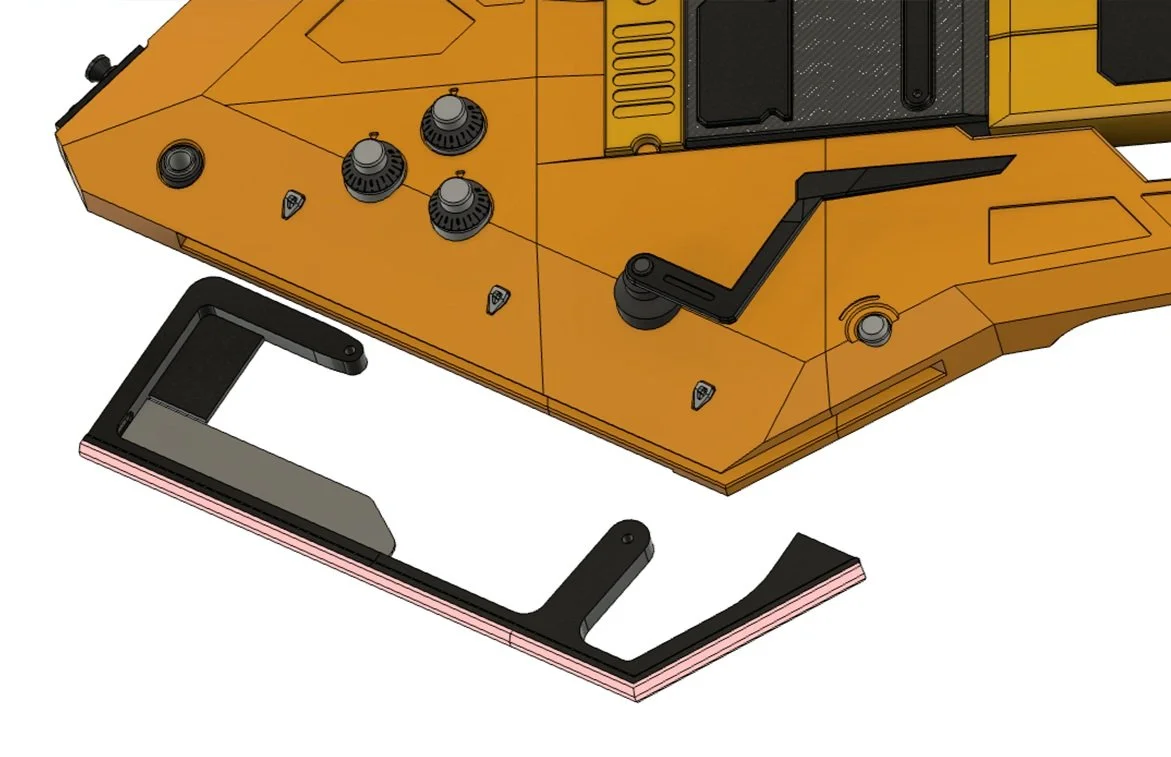
The cartridge is split into a few smaller components to make printing easier and reduce the need for supports. Assembly is pretty straightforward once everything’s off the bed. For power, I’m using the same 3V coin cell battery as the neck lights, keeping things simple and consistent. The lighting comes from a tightly packed strip of LEDs, which gives the blade a nice, bright glow without taking up much space. It’s a compact setup, but it delivers a solid visual impact.


The LED strip fits perfectly into a channel I modeled along the outer edge of the frame. It snaps in cleanly and stays in place without any extra adhesive, which makes wiring and future adjustments super easy.


The LED strip runs through a small channel and continues into the interior of the cartridge. That extra bit of lighting will eventually be used to illuminate some vent details I’ve planned for later. To keep things simple, I just extended the strip up to the seam that’s naturally left behind from gluing the frame together. It’s a clean way to make use of leftover light without adding complexity to the wiring.

Next, I attached the diffusers. These were printed in a semi-transparent PLA to help spread and soften the light from the LEDs. It’s a simple solution, but it does a great job of giving the blade a more even, glowing effect without needing any extra components.

I also added a small diffuser plate for the panel lights. For this, I used a print with a honeycomb infill and no top layer. The exposed honeycomb pattern not only helps diffuse the light, but also adds a really cool visual texture once it’s lit up—almost like a functional design detail baked right into the print. It’s a small touch, but it makes a big difference in the final look.


With the cartridge fully assembled, I wired in a switch and carefully slid the whole unit into the guitar body. The sliding part was a bit tricky—there’s not a lot of wiggle room—so I took my time making sure everything fit snugly and that no wires were getting pinched along the way. Patience here really paid off to keep the electronics safe and the fit clean.


The entire cartridge is secured with two M5 screws, just like the other components. It’s completely removable and uses real mechanical connections, which makes future maintenance or upgrades super straightforward. No glue, no fuss—just solid, reliable hardware holding everything in place.

And that wraps up the final step! The blade adds just the right amount of lighting and visual intrigue to the overall build—it really completes the look. Plus, since it’s fully removable, I’ve got the flexibility to swap it out if I ever want a slimmer profile or just don’t feel like managing lights at a con. It’s a great balance between function and flair.


Final Shots
Enjoy the final beauty shots of the Higgs Guitar from Death Stranding 2: On the Beach. This was an incredible project to bring to life—definitely the most detailed build I’ve done to date. As a huge fan of Death Stranding and Kojima’s work, this was truly a labor of love from start to finish. Thanks for following along!


Build Your Own Higgs Guitar from Death Stranding 2: On the Beach
If you’re looking to 3D print your own Higgs Guitar from Death Stranding 2: On the Beach, you can purchase the complete STL file set in our shop! These high-quality, print-ready files include everything you need to 3D print, assemble, and finish the guitar just like in this build.
I personally design, test, print, and assemble every project—so you can be confident that you're getting a thoroughly vetted and maker-approved design. No outsourced models, no untested files—just fully functional, high-detail 3D printables.
Your download will also include detailed build instructions, a full parts list for the additional hardware, LEDs, electronics, and everything else you’ll need to bring your prop to life. Whether you're building for a cosplay, display piece, or just love Death Stranding and Kojima’s world, this project is a must-have for serious fans and makers alike.
Version 2.0
Obviously, this design was created using screenshots and video from an unreleased game—Death Stranding 2: On the Beach. Once the final game is released (and hopefully, Kojima willing, we actually get to use this guitar as a weapon!), I fully plan to revisit the model and update it for greater screen accuracy.
That said, I really love the version I created here. It was a fun challenge to work with limited reference material and pull inspiration from other sources to fill in the gaps. It pushed my creativity and made the build process that much more rewarding.
And just a heads-up: anyone who purchases the STL files now will receive any future updates completely free. So when the improved version drops, you'll get it automatically—no extra cost.
I’ve also got some ambitious ideas in the works, including a reworked version that could house an actual Guitar Hero controller inside the body. I’m not sure exactly how I’ll pull that off yet—or if it’ll even be possible—but it’s definitely something I’m excited to explore.
Thanks so much for checking out this build!
Happy printing, and keep building awesome stuff.